With LocalCoinSwap Cryptoshares recently being added to Uniswap, we want to make it as easy as possible for token holders to take advantage of this new way to exchange LCS tokens and to be able to take part in providing liquidity on Uniswap for LCS tokens if desired. If you haven’t used Uniswap before, have no idea what it is, or would just like a quick refresher then this beginner’s guide to using Uniswap is for you.
What is Uniswap?
Uniswap is a decentralized ethereum based protocol relying on multiple smart contracts that allows the exchange of ERC-20 tokens while providing automated liquidity. It removes the need for trusted third parties during trades and instead relies on the power of smart contracts for trading. Uniswap is open-source allowing for the community to review the code, and due to being licensed under the GPL developers are even able to modify and release their own version of the protocol provided they follow the quite liberal terms of the GPL license.
Advantages of Trading Tokens with Uniswap
While quite different from the P2P exchange we provide at LocalCoinSwap where you can buy cryptocurrency with just about any payment method available and with a huge range of fiat pairs, Uniswap provides an interesting new approach to trading ERC-20 tokens on the ethereum network.
Non-Custodial:
At LocalCoinSwap we are supporters of having the option to choose non-custodial trading and this is one of the reasons we have decided to add LCS tokens to the Uniswap platform.
Broad Access to the Ethereum Ecosystem:
It seems that there has been and will likely continue to be a significant resurgence in the projects launching on the ethereum network. Alongside this, there also seems to be a shift by many of these newer projects to avoid paying the often exorbitant fees that can be requested for order-book exchange listings and instead opting to use Uniswap instead.
Earn Fees by Providing Liquidity:
When you add to a liquidity pool you will be able to earn fees from any trading that occurs within that pool. The fee taken by Uniswap per trade is 0.3% and this goes on to get split into two portions. One part 0.25% of the amount traded gets split among liquidity providers and 0.05% goes to the Uniswap protocol itself.
Risks of Using Uniswap
Fake Tokens:
With the ability to list on Uniswap being very accessible, this opens up the risk of fake or clone tokens being listed on the platform. Always double-check that you are dealing with the correct contract when manually adding the link to Uniswap or when using any of the provided lists. This is not a fault in Uniswap, just a by-product of the freedom provided by the protocol.
Volatile Gas Prices:
Currently, gas prices on the Ethereum network are fluctuating and reaching new highs on a regular basis. It’s important to ensure you are using a high enough gas price to help avoid failed transactions. Also, with transaction fees currently being quite high, it’s worth factoring those into your calculations when preparing for a trade, especially smaller trades.
Impermanent Loss:
As token price is generally quite volatile you run the risk of facing impermanent loss while providing liquidity on Uniswap. Impermanent loss is caused when the price of the token in question diverges from the original price in any direction, the more price movement the more divergence. While impermanent loss can cancel itself out if this is only temporary, often it will not be and result in a permanent loss that is locked in once you remove your assets from the liquidity pool. To further understand the maths behind impermanent loss you can find out more in this fantastic post by Bancor about the subject.
Connecting MetaMask to Uniswap
While WalletConnect and other options are available for connecting to Uniswap, one of the most popular ways to access it is to use MetaMask. This can be done in a few simple steps which you will find quite straight forward if you have used MetaMask in the past to interact with any smart contracts, or even if you’ve used it to trade ethereum or ERC-20 tokens on LocalCoinSwap in the past.
Step 1: If you haven’t already, head over to metamask.io and install the MetaMask wallet. Most commonly this is used with Google Chrome, but it is also available for Firefox, Brave, Android. and iOS. For interacting with Uniswap you’ll most likely want to use the Chrome or Firefox version depending on which browser you would prefer to use.
Step 2: Go to the Uniswap website at uniswap.org and select Launch App by clicking the button at the top of the page. At this point, you will be directed to the exchange where you will find the Swap and Pool dialog as well as a Connect to a wallet button at the top of the page along with some other settings.
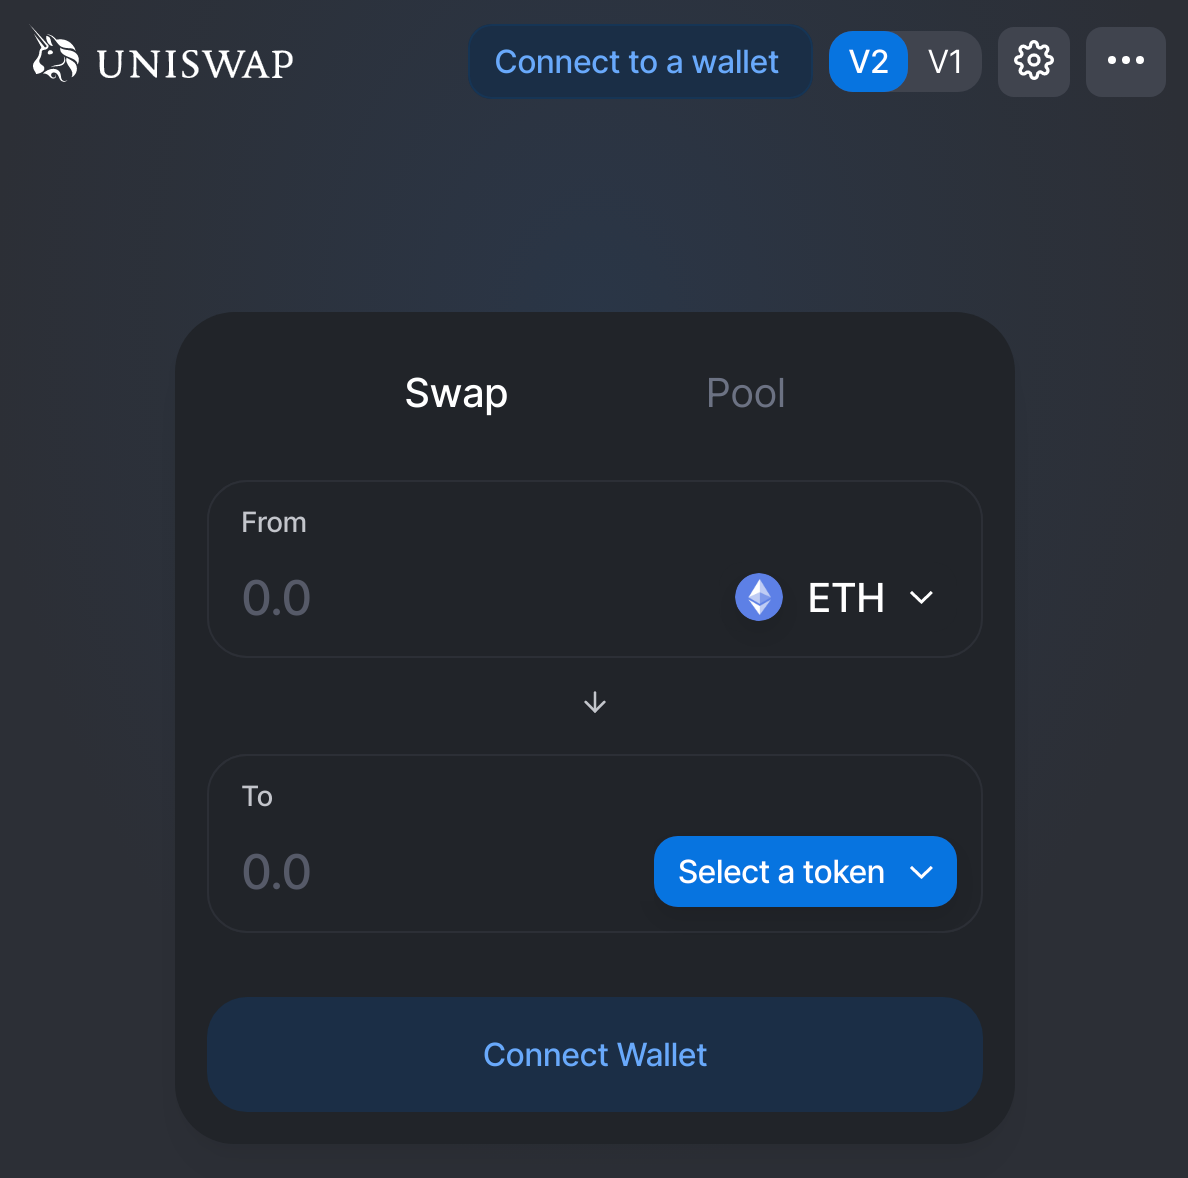
Step 3:
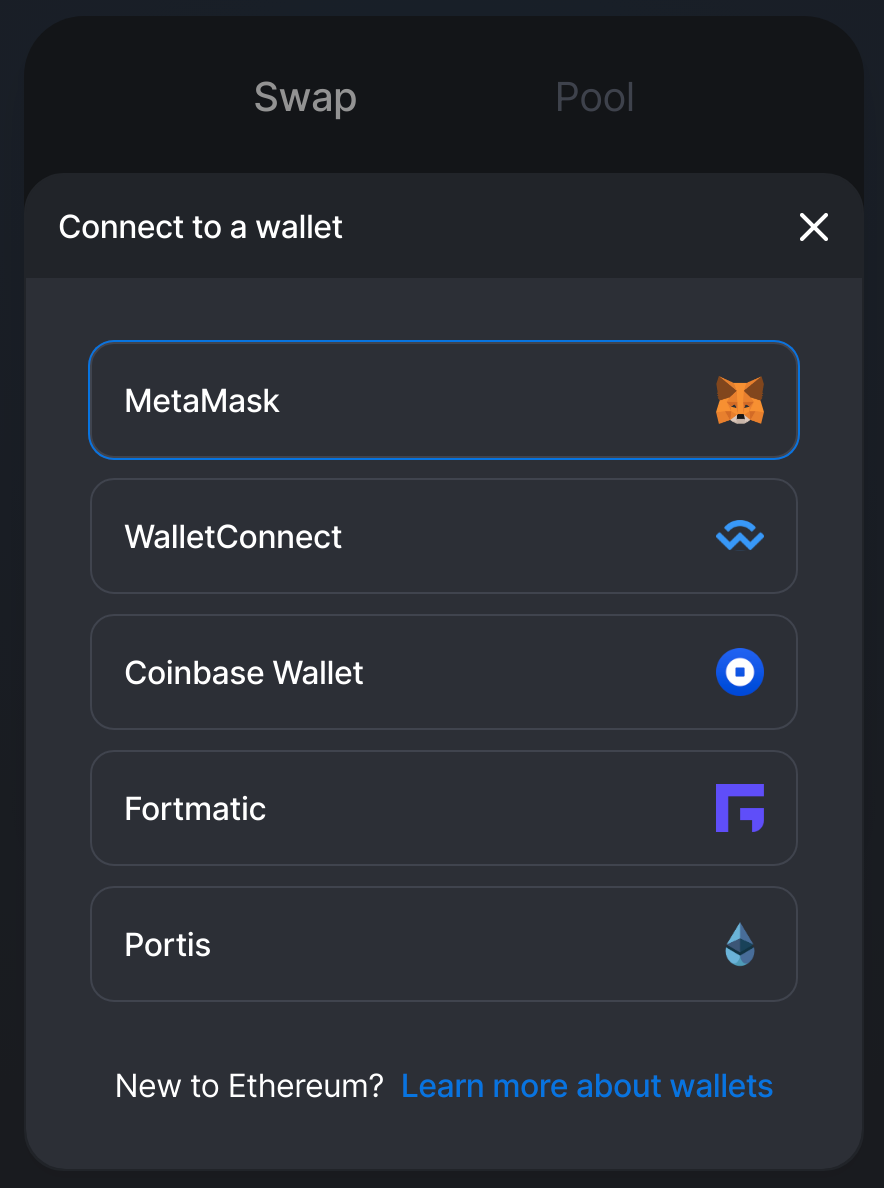
Click or otherwise select the Connect to a wallet button at the top of the page or the Connect Wallet button on the dialog in the center of the page which will take you to a new menu and enable you to select which wallet to connect to, in this case, you’ll want to select MetaMask.
Step 4:
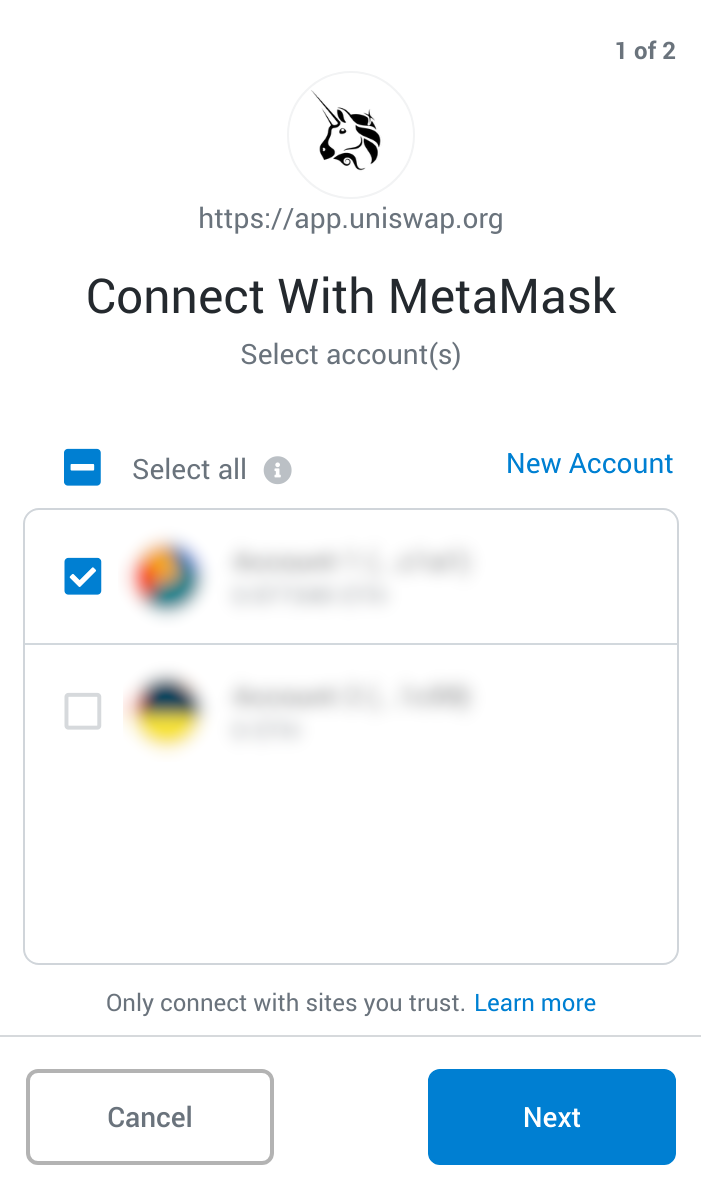
A window will appear provided by MetaMask asking for permission to connect to Uniswap and to select an account to use. Select the account you wish to use and once you are ready click next. It will request some permissions at this stage and if you agree you can accept and approve the connection to Uniswap.
Exporting Your Private Key or Mnemonic from LocalCoinSwap
Thanks to LocalCoinSwap providing non-custodial ethereum wallets to users you are able to export your private key from LocalCoinSwap and use this directly in MetaMask and other wallets like MyEtherWallet. if you wish to do so. Doing this is useful if you want to avoid fees transferring between the platform wallet and another wallet or would just prefer to use the same wallet you use on LocalCoinSwap already.
If you would like some more information about exporting your private key and importing it into MetaMask you can find more information in this article on our support portal. Please be extremely cautious when handling your private key, access to it by anyone else gives them the ability to have complete control of your funds. Ensure you feel confident before handling your private key and never disclose it to anyone.
What are Liquidity Pools?
Liquidity pools are formed where a smart control manages and controls a pool of tokens. Uniswap allows anyone to start a new pool for a token at any time provided that they are willing to lock up both the token and an equivalent value of ethereum. The initial price of a token when a pool is formed is based on this balance of token and ether that is put up by the trader starting the pool. If the price differs from external markets or speculative value in general it will likely be arbitraged by other traders looking to profit from the price discrepancy.
Liquidity pools are an interesting approach to automating token prices without the need for order books or external pricing sources that are relied on by many centralized exchanges. Similar to P2P trading the market is free to adjust the price and any discrepancies will be absorbed by arbitrage opportunists. For example, just as prices naturally vary yet can be relatively consistent on LocalCoinSwap for different payment types that are either easier or more difficult to provide, Uniswap leverages exposing opportunity to traders in order to maintain what the market considers a fair price at any given time.
Adding Liquidity to a Uniswap Pool
Now we’re going to look at how you could become a liquidity provider by adding your tokens to a pool. In this case, we’re going to look at how you could add LCS Cryptoshares and ETH to a Uniswap pool, however, the process is much the same for any token you may wish to add liquidity for as well. For this section, we’re going to assume you have already connected MetaMask or another wallet and approved the connection. If not, please go and do so now before proceeding.
Please follow these steps at your own risk, the following tutorial is not a recommendation and should be purely considered informative.
Also note, these steps may change at any time but were correct at the time of writing. If you are already familiar with adding liquidity to Uniswap you can head here and start staking LCS tokens right away. Do your own research before using Uniswap or any other platform.
Step 1:
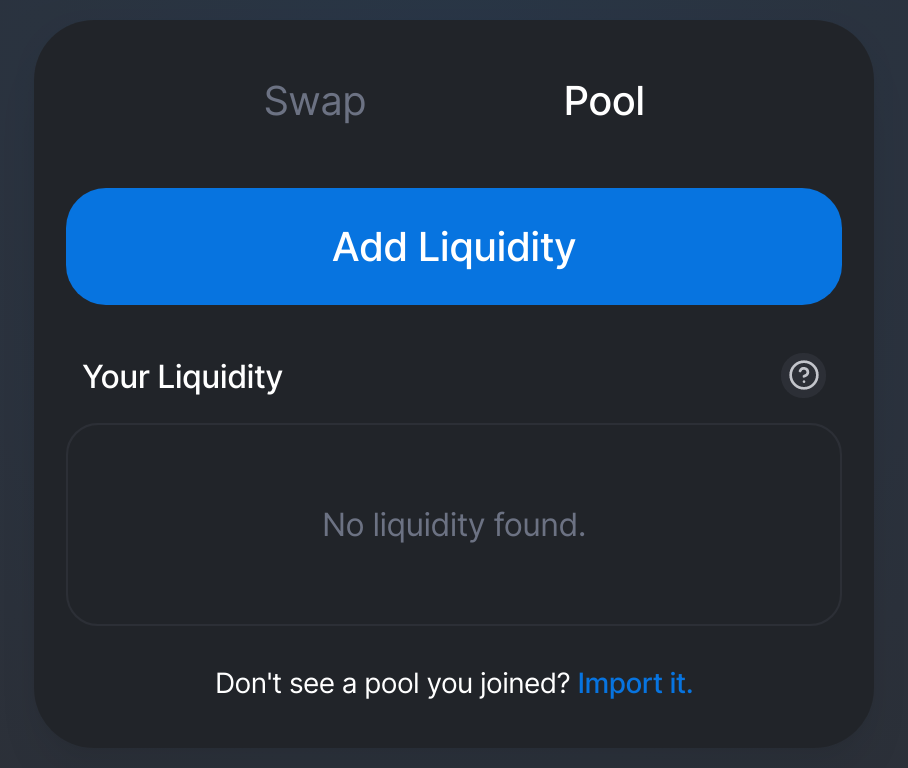
From the Uniswap exchange page select Pool and you will be greeted with a button that reads “Add Liquidity” press it to continue.
Step 2:
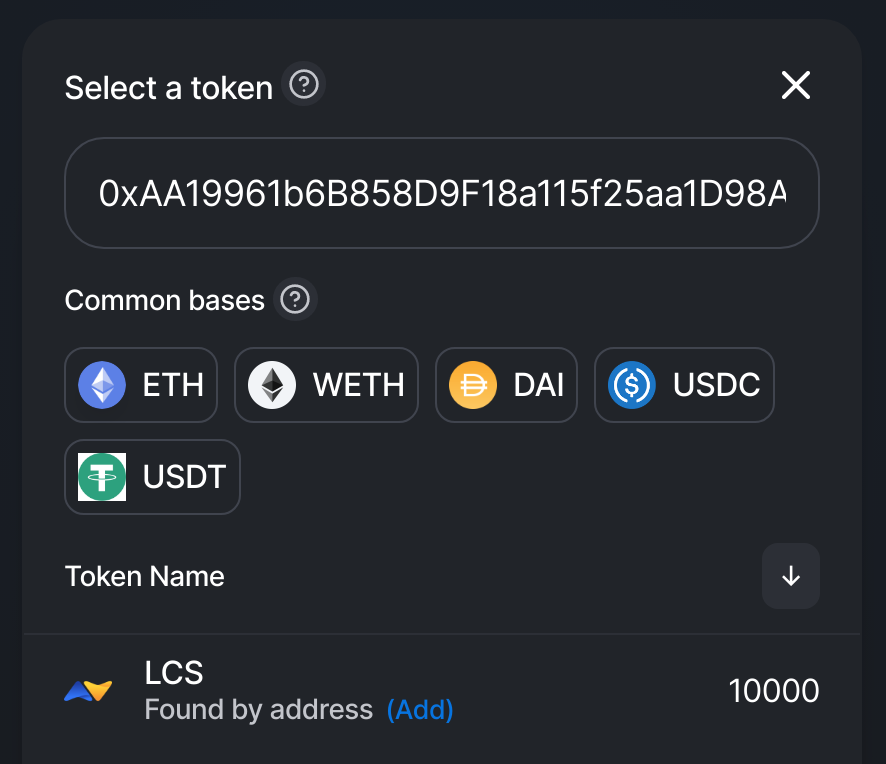
At this stage you will see the Add Liquidity dialog, as we haven’t selected a token yet we’ll need to do so now. In the lower half of the dialog, there is a button labeled “Select a Token” press this and you will then see a new window appear. In this new window, you will be able to type a token name or paste an address, in this case, we are going to paste the address of the LCS Cryptoshares smart contract which can be copied from etherscan here or by carefully copying it from below.
LCS Cryptoshares Contract Address:
0xaa19961b6b858d9f18a115f25aa1d98abc1fdba8
Step 3:
Once the address has been placed into this page Uniswap will find the LCS token and allow you to add it. You can now do so by pressing “Add”, once you add the token successfully the text will change from “Found by address” to “Added by user”.
Step 4:
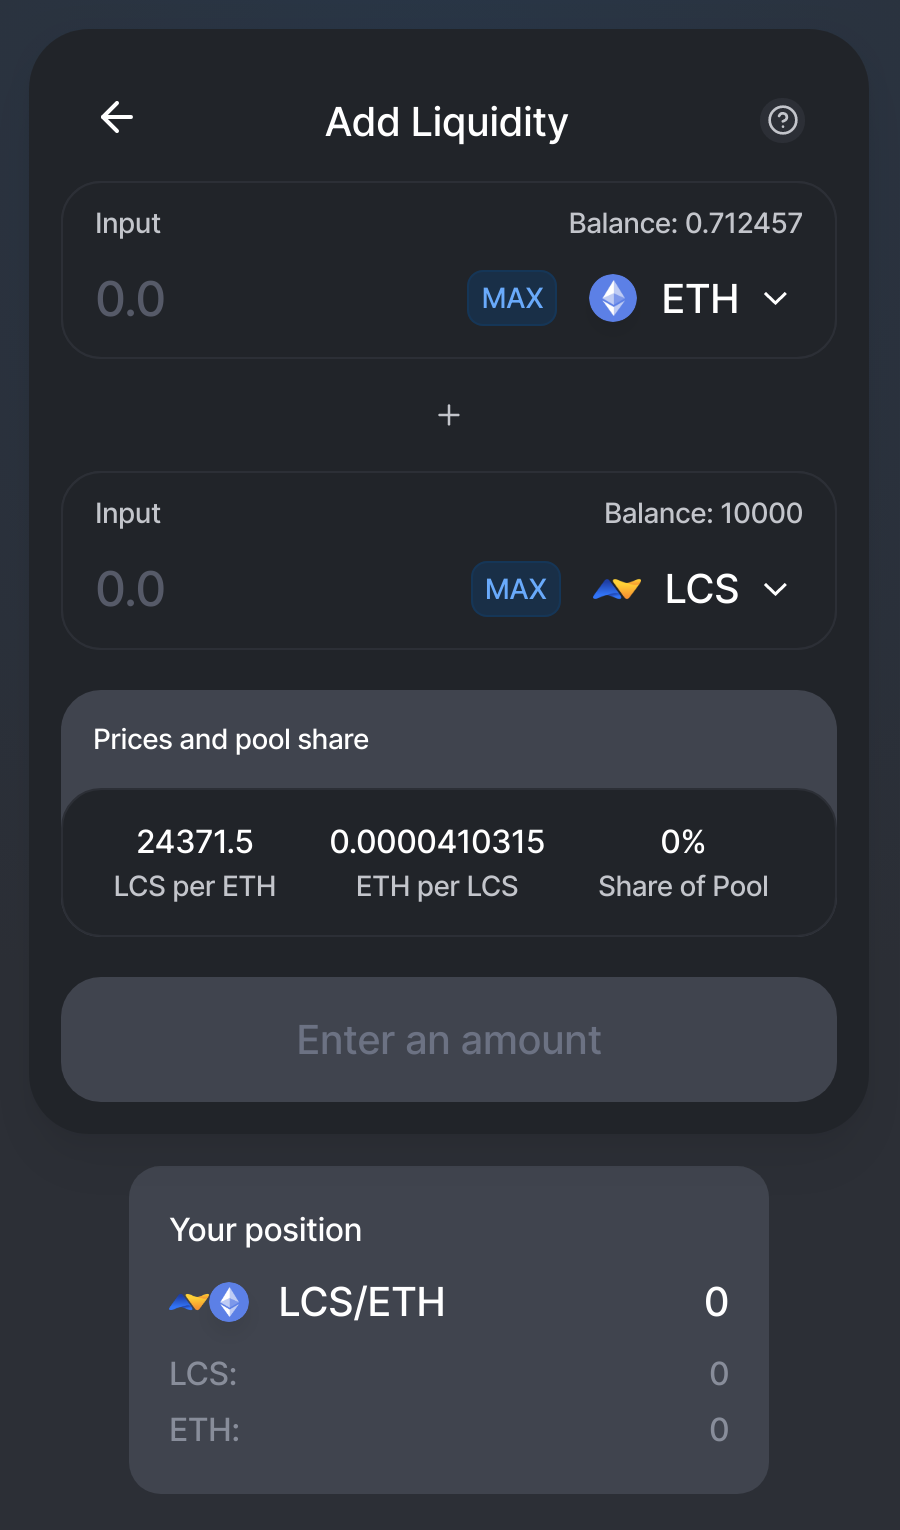
You can now click the token and you will return to the Add Liquidity dialog with ETH in the top half and LCS in the second half selected. If you are adding a different token this will be different of course. At this stage, we can see various metrics such as the current pool price and our share of the pool which at this stage won’t be anything and should simply display 0%.
Step 5:
We are now ready to add tokens to the liquidity pool. For this example, I’m going to add 10,000 LCS tokens to the pool. If you type the number of tokens you wish to stake the required amount of ETH will be calculated as well based on the current pool pricing. You could also use the MAX button to stake whatever is available in the wallet. It’s important to remember that you will need extra ethereum to approve and stake the tokens. For more information on current gas, pricing check out ETH Gas Station. The values in the provided screenshot will likely vary from what you see based on current pricing which can change at any time, consider them only an example. Once you are ready you can click approve and move on to the next step.

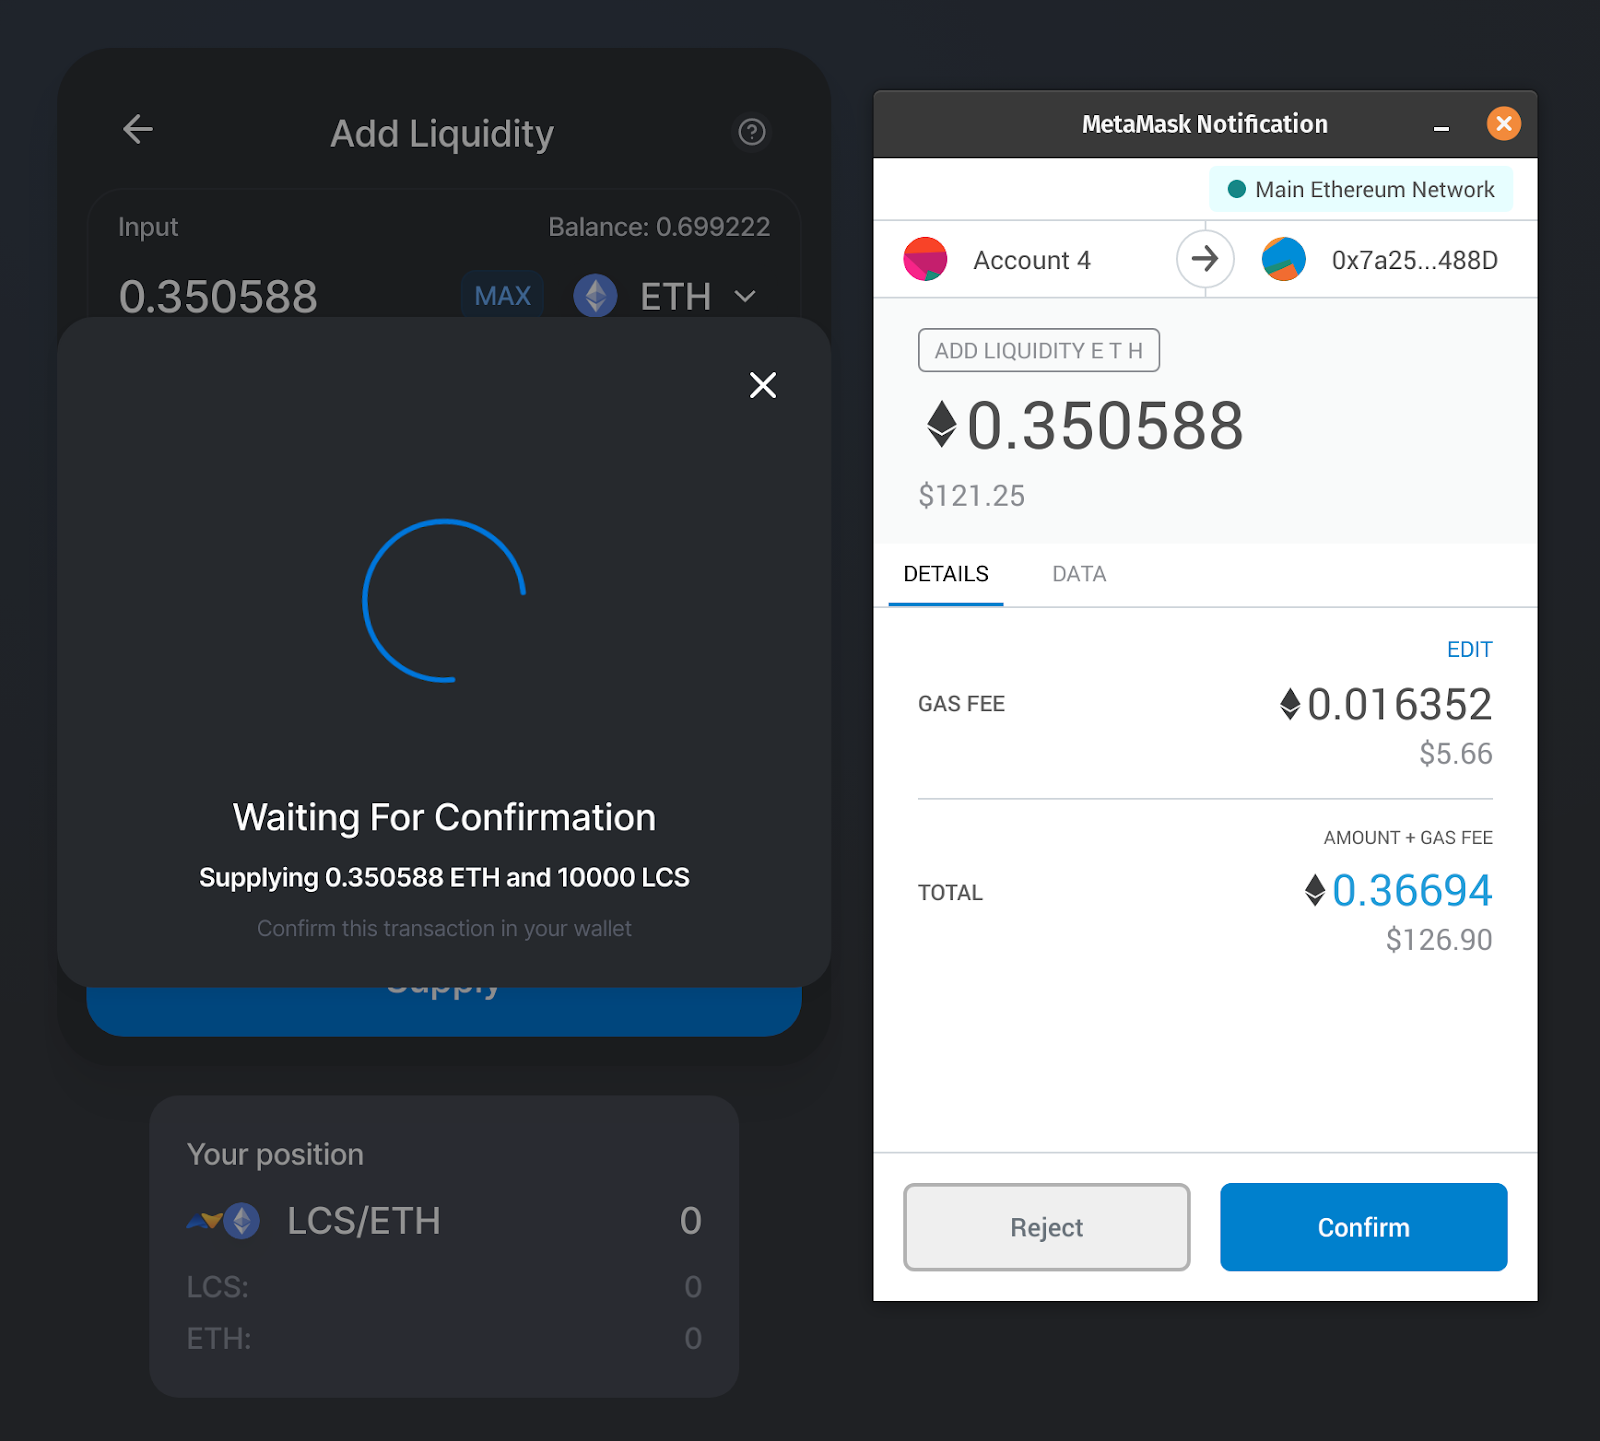
Step 6:
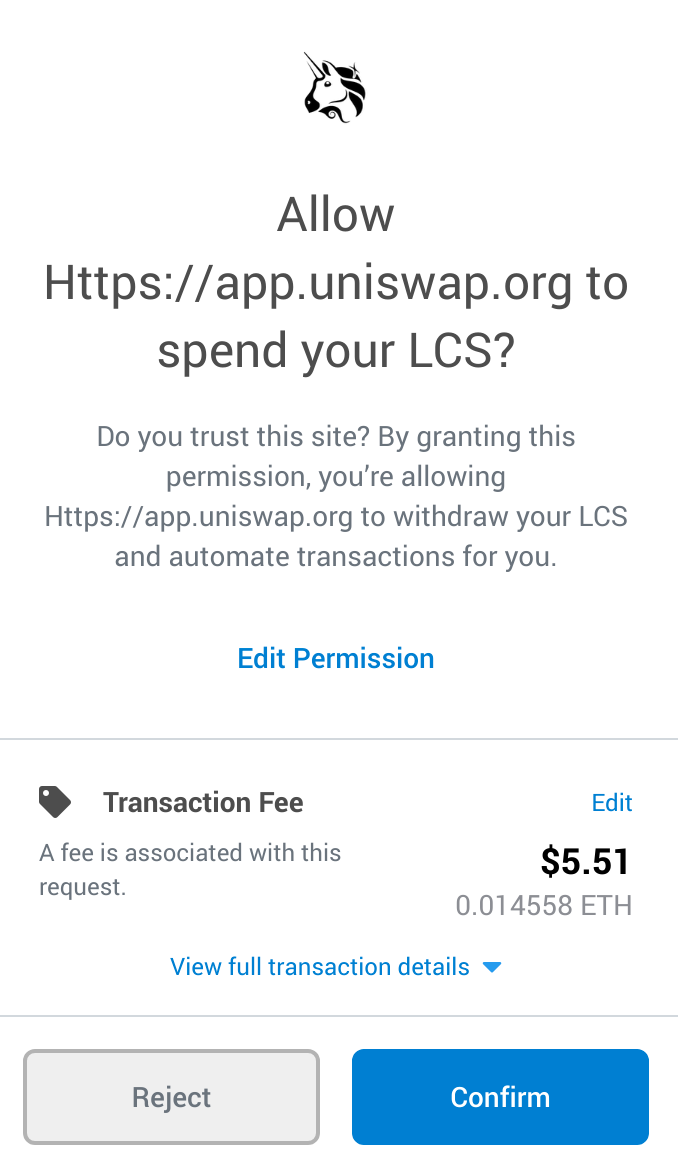
Once you select Approve you will have to allow Uniswap access to your LCS available in MetaMask. This will require a transaction and will incur fees to perform. The amount of fees will vary and are estimated by MetaMask, if you would like you can also customize them by pressing edit, just be cautious about setting the fee too low as the transaction may fail. Once you are satisfied with the set fee you can accept by hitting Confirm and wait for the adequate confirmations to continue. If the approval is successful you will now see the Supply button is now blue and available.
Step 7:
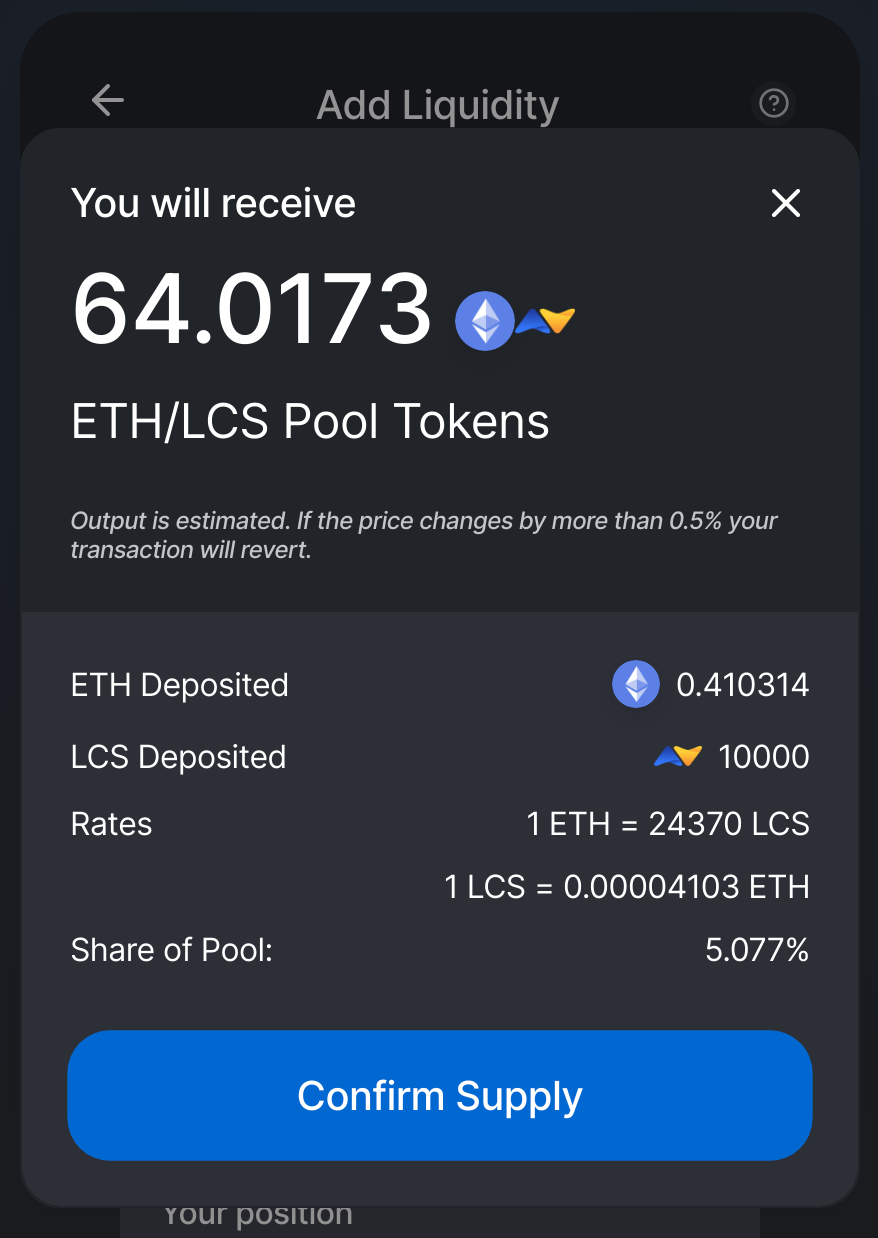
You can now press supply if you are ready to proceed, a new dialog will appear and provide you with various information about what you are about to do. It will include values such as the amount of ETH you are depositing, as well as the LCS tokens being staked. Rates and pool share will also be displayed here. Be sure you are satisfied with all these metrics before continuing. You will also notice the number of Pool Tokens you will receive listed at the top. Pool Tokens are provided in return for your ownership of a stake in the pool and can even be traded or sent to another wallet if you choose to do so. These tokens can be used later to redeem your stake in the pool. If you are satisfied with everything you can press Confirm Supply to continue staking.
Step 8:
You’ll have to confirm the transaction with MetaMask to continue at this point, and once you do it will take a little time to confirm. If you go with the recommended gas fees suggested by MetaMask this will typically only take a few moments.
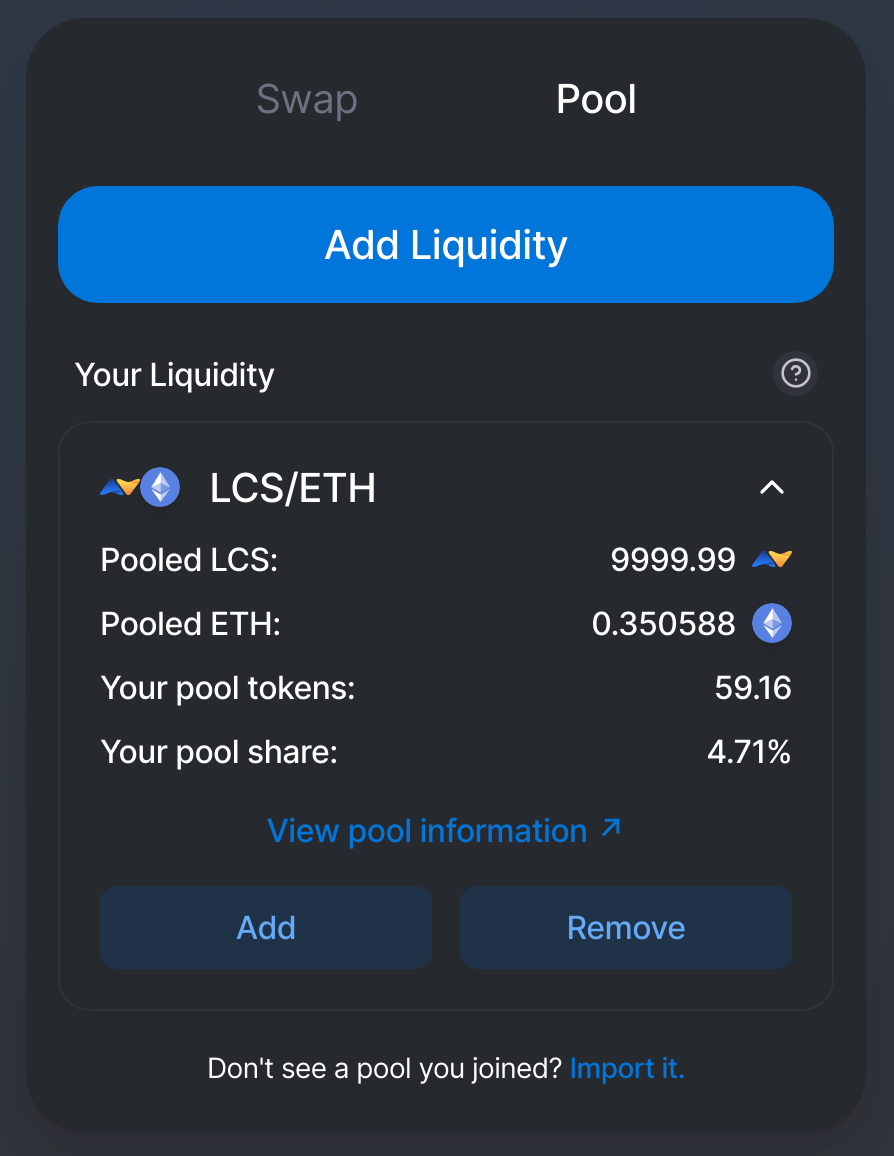
Finished Staking:
Now you have completed the process and have staked your tokens in the liquidity pool. You can add more or remove liquidity using the buttons below. While this may seem like a fairly broad process it has been broken down into quite small steps to ensure it is manageable for those newer to dealing with ethereum, MetaMask, and Uniswap.
How Does Pricing Work on Uniswap?
Uniswap prices vary based on the balance of being maintained in the pool. The pricing can be expressed using a very simple equation, x*y=k. Every time there is a trade, assets are removed from the pool which in turn varies the price. If pricing diverges from what the market participants (traders) deem too high or too low, this can and likely will be arbitraged against other exchanges. This very direct approach to pricing allows for a very honest system in regards to price discovery. You can also use uniswap.info to check the pricing of LCS/ETH and other pairs being traded on Uniswap along with other stats such as current pool liquidity and volume.
For example:
LCS (in pool) x ETH (in pool) = Price of LCS
Moving the LCS Buyback to Uniswap?
For the Q3 of 2020 buyback due to be held on September 20th. We are seeking feedback from the community regarding potentially moving the buyback and burn from Hotbit to Uniswap. We would love to hear from as many of you as possible to see if this is something you would like to see happen. Please consider reading the Uniswap Buyback proposal and giving your feedback on this idea.
Come join the community on Telegram or Follow us on Twitter for more updates on the project and more information about the broader cryptocurrency space. For more cryptocurrency content check out our blog.